

- This time we will use TLF classes for the most part.
- When the user resizes the application, we want our textflow to automatically adjust to the new size and redraw, and this includes re-positioning the inline dropdownlist.
(Unfortunately, you can't see this in the app below, you'll need to open it in a new window and resize it to see it in work. A direct link can be found here.) - We will add some interactivity to the text - namely - show tool-tips on some of the words (on mouse roll over).
In the first part we saw how to use the Flash Text Engine classes for basic text rendering. We created a TextBlock from several ContentElements, and then used the TextBlock's createTextLine() method to manually create and position the actual (visual) lines inside a container.
Now, it would be very weary to have to do this for every piece of text that we wanted to display in our application...
This is where the TLF classes come in handy: Instead of having to do these calculations by ourselves, we can simply link a textblock (the term in TLF is now TextFlow) to a container, leaving it up to Flex to handle the positioning (also called "composition"). This means, for example, that if the container is resized for some reason - it is now possible to automatically relayout the text accordingly to still fit inside it the best it can.
As usual, let's get ourselves familiar with the main packages in this framework first:
- flashx.textLayout.elements
Contains the core classes used for representing text content in the Text Layout Framework. This are essentially the same "building blocks" we saw in Part 1, only now they have slightly different names, for example you can say that GroupElement is now called ParagraphElement; Instead of TextBlock, we use TextFlow etc..
All of these elements (like SpanElement, ParagraphElement etc) are FlowElements.
If they are grouping elements (meaning that they can contain other elements) they will also inherit from FlowGroupElement.
But if they're simple elements like text and graphic then they're considered a leaf in the textflow tree, so they will be inherited from FlowLeafElement.
- flashx.textLayout.compose - contains the classes used for breaking text into lines, and arranging lines in containers.
There aren't many classes in this package. For a basic composition you will most likely use StandardFlowComposer.
- flashx.textLayout.container - contains classes for displaying text in the Text Layout Framework.
In this chapter we will use the fundamental ContainerController which defines the relationship between a TextFlow object and a container.
- flashx.textLayout.events - contains event classes for the Text Layout Framework.
The main events are: CompositionCompleteEvent, UpdateCompleteEvent, and FlowElementMouseEvent. We will see them in use later on this chapter.
Now let's see how we can use all that in our sample application:
Creating the Text Flow
TextFlow is the most basic class here... It contains all of our text (or "story") in the form of a hierarchical tree of elements. A TextFlow can, for example, look like this:
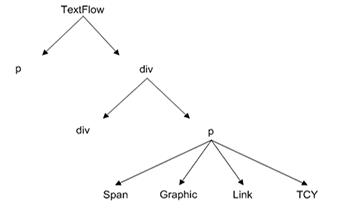
In this example our story contains two elements: a paragraph and a div element. That div by itself contains two other elements - another div and another paragraph. And That paragraph consists of a SpanElement, some graphics, a linkElement and so on...
The reason that this "tree" form is important is because it allows us to automatically apply any style that we give to a container element - to all of its descendants. For example, if I set my root textflow with a textcolor of green, then all of my text (in all the containing paragraphs, and THEIR children, etc.) will be green too, unless I change the color explicitly on one of the descendants...
One way to create a TextFlow is to import it from an HTML-like text, as this small example shows:
private static const textInput:XML = <TextFlow xmlns="http://ns.adobe.com/textLayout/2008">
 <div>
 <p color="0x336699"><span>The Text Layout Framework is an extensible library, built on the new text engine in Adobe Flash Player 10, which delivers advanced, easy-to-integrate typographic and text layout features for rich, sophisticated and innovative typography on the web.
 </span></p>
 </div>
 </TextFlow>;

private var _textFlow:TextFlow;
var importer:ITextImporter = TextConverter.getImporter(TextConverter.TEXT_LAYOUT_FORMAT);
textFlow = importer.importToFlow(textInput);
In our sample application, however, I don't want to import the text, so for now I'll just create an empty textflow and link it with my container the way TLF allows me to:
_textFlow = new TextFlow();
_textFlow.flowComposer.addController(new ContainerController(container, width - PARA_PADDING, height - PARA_PADDING));
Note that to the FlowComposer of a textflow I only add a single controller, and that's because I only have one container in my application. If I wanted my text to run over multiple containers for some reason, then I would have to add more controllers, so that there will be one for each container.
var p:ParagraphElement = new ParagraphElement();
p.fontSize = 16;
p.linkNormalFormat = [{color:0x0000aa}];

// -- some code to add SpanElements (one for each word) to the Paragraph goes here
//    and some LinkElements as well --

_textFlow.addChild(p);
Here I create a new paragraph, and set some of its styles. Pretty straightforward.
In the sample application I break a string with a space character as a delimiter, and add each word as a separate SpanElement to the paragraph.
For the two words I need tooltips for, however, I must create LinkElements, because they are the only text elements that can interact with the mouse!
The next lines tells my textflow that the the only thing the user can do with it is select text from it:
_textFlow.interactionManager = new SelectionManager();
If I wanted the user to be able to also edit the text, etc, I would replace SelectionManager with EditManager and so on.
Great. now let's listen to roll over and roll out events from our textflow:
_textFlow.addEventListener(FlowElementMouseEvent.ROLL_OVER, onRollOver);
_textFlow.addEventListener(FlowElementMouseEvent.ROLL_OUT, onRollOut);
Remember, they will trigger only for LinkElements.
OK, we're done composing our textflow.
The UPDATE_COMPLETE event
You might remember that in my previous inline uicomponent example application this is the point where we positioned our DropDownList. Now this position is no longer static, it can potentially change if the user resizes the application etc, so we can't do that here anymore. Instead, we'll listen to the UPDATE_COMPLETE event and do it there.
_textFlow.addEventListener(UpdateCompleteEvent.UPDATE_COMPLETE, repositionCombobox, false, 0, true);
_textFlow.flowComposer.updateAllControllers(); // update the display
updateAllControllers() is important, as it composes the content of the root element and updates the display immediately. It also triggers the UPDATE_COMPLETE event for the first time which we need in order to initially position our DropdownList.
The code for positioning the dropdownlist is a bit different with the TLF, it's actually easier because TextFlow now has a nice method called getElementById. Easy to locate our place holder InlineGraphicElement and move our dropdownlist on top of it:
// Whenever display is updated we need to reposition the dropdownList because
// its location in the flow could have changed
private function repositionCombobox(event:UpdateCompleteEvent):void
{
 // get inlinegraphicElement place holder and put combobox in its place
 var pHolder:InlineGraphicElement = _textFlow.getElementByID("b") as InlineGraphicElement;
 cb.width = pHolder.width - 20;
 cb.height = pHolder.height;

 // position combobox over the InlineGraphicElement
 cb.move(pHolder.graphic.localToGlobal(new Point(0,0)).x + 10, pHolder.graphic.localToGlobal(new Point(0,0)).y + 3);

 // add the combobox to the display list if not already added
 if (cb.parent != this)
  addElement(cb);
}
Handling resize
OK, now we just need to make sure that his method is called whenever the application resizes. This means two things: changing the composition size (it doesn't know to change automatically) and update the textflow display again.
here is the resize handler function:
private function resizeHandler():void
{
if (_textFlow && _textFlow.flowComposer.getControllerAt(0))
{     _textFlow.flowComposer.getControllerAt(0).setCompositionSize(container.width, container.height);
     _textFlow.flowComposer.updateAllControllers();
}
}
Responding to mouse rollover events to create Tooltips
This is the only somewhat complicated code in the application. The tricky part is to figure out the position of the LinkElement that has been rolled over, and create a tooltip just above it.
To find out an element's position we will have to find which actual TextLine currently contains that link. Luckily, you know all about it from Part 1 of this tutorial so you shouldn't be intimidated.
// Handle link roll over
private function onRollOver(event:FlowElementMouseEvent):void
{
if (tt)
{
 ToolTipManager.destroyToolTip(tt);
 tt = null;
}

// Get the LinkElement that triggered the alert
var link:LinkElement = event.flowElement as LinkElement;

// Find out the link's position on screen
var linkStart:int = link.getAbsoluteStart();
var textFlowLine:TextFlowLine = link.getTextFlow().flowComposer.findLineAtPosition(linkStart);
var lineStart:int = textFlowLine.absoluteStart;
var linkStartInLine:int = linkStart - lineStart;
var tl:TextLine = textFlowLine.getTextLine(true)
var rect:Rectangle = tl.getAtomBounds(linkStartInLine);

var xx:int = rect.x;
var yy:int = rect.y; // y will always be 0
xx = container.localToGlobal(new Point(rect.x, rect.y)).x;
yy = container.localToGlobal(new Point(tl.x, tl.y)).y;

var word:String = event.flowElement.getText(); // our link's text

// ...
// code to create and place the tooltip goes here!
// ...
}
In lines 4-8 we just destroy any previously created tooltip, if one exists.
Line 11: It's very easy to get the LinkElement that triggered the event , with the event's flowElement property.
In line 14 we use getAbsoluteStart() to get the absolute index of our link in the textflow.
We then use it in line 15 to get the TextFlowLine that contains that link.
By the end of line 16 we have the absoluteStart of both our link and the line that contains it.
Subtracting one from the other gives us the position of the link RELATIVE to the line.
Line 18: This is the part where we need the FTE to get the actual TextLine that lays under the TextFlowLine.
Line 19: That's it! TextLine has a convenient method for getting for getting the bounds of a single atom (letter) in the line, by its index which we have by now!
From here, converting the coordinates to global ones and creating /positioning the tooltip on these coordinates is a breeze.
Full source will be uploaded as soon as someone leaves a comment below :)
Full source here.
Thanks for this post.
ReplyDeleteTLF is powerfull but hard to crack nut.
This post helps to crack it ;)
Also I would not mind to look at the full source code.
Really good post, I was just about to dive into the TextFlow calculations to determine location and you just saved me hours of hacking! Really appreciate it!
ReplyDeleteThank you so much for the post. It helped me a lot.
ReplyDeleteI added it to my TLF Editor. One thing I am bit confused is, that I get the tool tip only when I click Contorl button and bring the mouse. Just taking the mouse over doesn't call the 'onRollOver' function. If you have any idea about this behavior please let me know.
Thanks
THANK YOU for showing me how to put form fields into TLF. I work for an elephant company that will be very happy that I can add checkboxes for a todo list.
ReplyDeleteVery useful post, thank you! I am a mathematician working with Flex and I am trying to figure out how to use TLF for writing fractions and square roots. Any help would be appreciated.
ReplyDelete